40 Automations User Guide
40.1 Overview
Status: This page is technical reference for the Automations 0.92.1 implementation. It does not claim customer availability; staging verification and production enablement are separate gates.
This guide covers how to create, test, and publish automated workflows using Sophea Automations.
Knowledge answer, knowledge search and batch knowledge search apply the same caller-upload rule as normal chat: company sources remain subject to their access controls, and personal uploads are limited to the resolved Nous user’s own files. An unresolved workspace user is denied. A run without an explicit triggering member keeps the existing default automation-runner resolution; it does not gain unrestricted upload access.
40.2 Getting Started
40.2.1 Opening the builder
- Sign in to the Sophea Nous web UI and open Automations.
- On an empty Automations home page, choose Start from scratch to open the builder. From a populated home page, choose Create New > New Flow.
40.2.2 The builder interface
The builder has a flow-title header, a Canvas, and a resizable right panel. The header includes Actions, Runs, Refine with AI, and the flow status control. Select a trigger or action on the Canvas to open its Step Settings in the right panel; Runs opens Recent Runs, and Versions in the Actions menu opens version history. The step data panel supports a split view or a drawer. Narrowing a split view closes the data pane and switches it to drawer mode; this is not a fixed mobile-screen layout. Step testing is separate from published flow executions.
To browse built-in templates from the Automations home page, choose Use Templates or open All templates. Search by name or description, browse official templates by category, and preview a card before choosing Use Template.
40.2.3 Importing and exporting flows
Open a flow’s Actions menu and choose Export to download its .json file. The flow-list row menu also offers Export; exporting multiple selected flows downloads a .zip.
In the destination workspace, choose Import > Import Flow, select the .json or .zip file, choose its folder, and click Import. To replace a flow’s draft, open that flow’s Actions menu and choose Import. Review recipients and other workspace-specific settings before publishing: a custom export is not a catalog starter template and does not receive starter-template recipient prefill.
40.3 Creating Your First Flow
40.3.1 Step 1: Choose a trigger
Every flow starts with a trigger. Available triggers include:
- Manual Trigger: start a published manual flow with Run Flow.
- Schedule: recurring
every_day,every_week,every_month,every_hour,every_x_minutes, orcron_expressionschedule. - Webhook: start on an HTTP request to the Live or Test URL shown in trigger settings; authentication is configured per trigger.
- Human Input > Web Form: start when someone submits the published form.
- Tables:
newRecord,updatedRecord, anddeletedRecordtrigger on events for the selected table; these are webhook-driven table events, not polling watchers. - Agent Run Completed, Document Indexed, Connector Sync Completed, and Connector Sync Failed: configured Nous polling watchers, not global workspace-event subscriptions. Select the specific agent run, document, or connector to watch. A watcher emits once for its configured item and resets when enabled or disabled.
The Agent Run Completed watcher polls the selected agent and agent_service_run_id until completed, failed, or cancelled. Document Indexed watches a document through success, failed, canceled, or completed_with_errors. Connector Sync Completed watches a connector for success or completed_with_errors; Connector Sync Failed watches for failed.
To add a trigger: 1. Click the arrow on the empty Select Trigger node, or focus that button and press Enter. 2. Select the trigger type and configure its settings in the right panel.
For Human Input > Web Form, configure text, text-area, toggle, or file fields, publish the flow, and share its Published Form URL. Enable Wait for Response and add Respond on UI when the submitter should receive workflow-generated Markdown or a file. The separate Forms Chat UI trigger is not available; Nous chat remains unchanged.
40.3.2 Step 2: Add actions
Actions are the steps that run after the trigger. To add an action:
- Click the “+” button below the trigger or any action
- Browse the piece picker or search for a specific action
- Select the action you want to add
- Configure the action’s inputs in the right panel
Browse Nous for Sophea actions and Utility for built-in utilities and Code. Within Utility, Flow Controller contains Loop and Router. Use the picker search to find an action. The Approvals tab provides Request human approval and Review with AI from the Nous piece; Create approval task is a separate Nous action, not an item in that tab.
40.3.3 Utility actions and flow controls
The shell-mode core utility catalog contains these 74 actions. The action IDs identify actions in saved flows; the versions identify the bundled pieces.
| Piece (version) | Action IDs |
|---|---|
| CSV (0.4.22) | convert_csv_to_json, convert_json_to_csv, convert_excel_to_csv |
| Data Mapper (0.3.21) | advanced_mapping |
| Data Summarizer (0.0.15) | calculateAverage, calculateSum, countUniques, getMinMax |
| Date Helper (0.1.35) | get_current_date, format_date, extract_date_parts, date_difference, add_subtract_date, next_day_of_week, next_day_of_year, first_day_of_previous_month, last_day_of_previous_month |
| Delay (0.3.35) | delayFor, delay_until |
| Files Helper (0.2.0) | read_file, createFile, change_file_encoding, checkFileType, zipFiles, unzipFile, get_file_name |
| Forms (0.4.22) | return_response |
| Math Helper (0.1.0) | addition_math, subtraction_math, multiplication_math, division_math, modulo_math, generateRandom_math |
| PDF (0.6.0) | extractText, convertToImage, textToPdf, imageToPdf, pdfPageCount, extractPdfPages, mergePdfs, addTextToPdf, addImageToPdf |
| QR Code (0.0.18) | text_to_qrcode |
| Storage (0.6.20) | get, put, append, remove_value, add_to_list, remove_from_list |
| Tables (0.5.2) | tables-create-table, tables-delete-table, tables-create-records, tables-delete-record, tables-update-record, tables-get-record, tables-find-records, tables-clear-table, tables-download-table |
| Text Helper (0.6.6) | concat, replace, split, find, find_all, markdown_to_html, html_to_markdown, stripHtml, slugify, defaultValue, json_to_ascii_table, extract_from_html |
| Webhook (0.1.42) | return_response, return_response_and_wait_for_next_webhook |
| XML (0.1.20) | convert-json-to-xml, convert-xml-to-json |
Code, Loop, and Router are built-in flow controls, not pieces or additional catalog actions. Use a Router to branch explicitly on approval outputs.
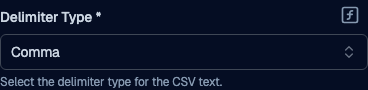
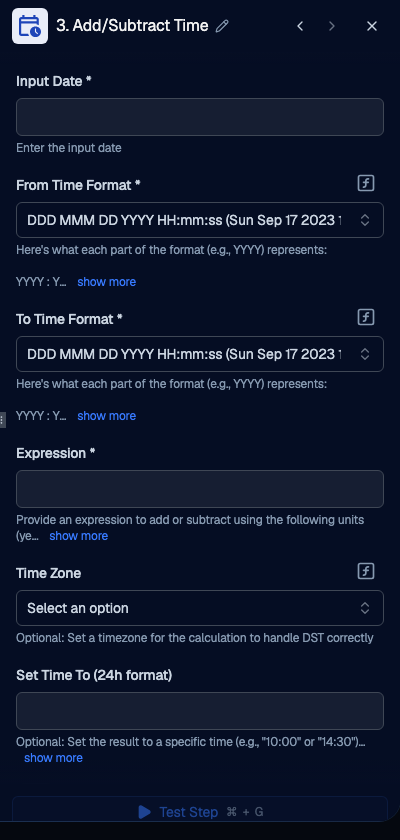
40.3.4 CSV and date defaults
Two common data actions start with supported defaults that you can change when your input requires a different format:
- Convert CSV to JSON sets Delimiter Type to Comma.
- Add/Subtract Time sets both From Time Format and To Time Format to
DDD MMM DD YYYY HH:mm:ss (Sun Sep 17 2023 11:23:58).
40.3.5 Available Sophea actions
| Category | Actions |
|---|---|
| Knowledge | ask_nous_knowledge, search_knowledge, batch_search_knowledge, fetch_chunks |
| AI | ask_workspace_model, run_nous_agent |
| Agent lifecycle | start_agent_run, get_agent_run_status, cancel_agent_run, get_agent_run_artifacts |
| Approvals | request_human_approval, llm_approval |
| Approval tasks | create_approval_task |
| Workspace | list_connectors, list_workspace_users, list_workspace_teams, notify_workspace, send_workspace_email |
| Documents | upload_document, get_document_status |
Workspace catalog limits: list_workspace_teams lists Portal-owned Teams; create and manage Teams in Portal, not in the personal-workspace Automations UI.
40.3.6 Start an asynchronous agent run
Use Start agent run when the flow should continue after starting an agent instead of waiting for its answer. It returns an agent_service_run_id, distinct from the flow run_id. In Get agent run status, select the same Agent and map that handle to Agent run ID. Statuses are pending, running, completed, failed, and cancelled; wait for a terminal status before requesting artifacts. Retrieve artifacts only after completed; route failed or cancelled outcomes separately. Cancel agent run can stop an in-progress run.
40.3.7 Step 3: Reference previous steps
You can reference the output of previous steps using the {{stepName.output}} syntax. For example:
{{trigger.output.body.email}}to reference the email from a webhook trigger{{step_1.output.answer}}to reference the answer from a knowledge search{{step_1.output.chunks[0].content}}to reference the first chunk from a search
40.3.8 Step 4: Test the flow
Before publishing, test each step:
- Select the step you want to test
- Click “Test Step” in the test panel
- The step will execute and show the output
- Use the output to configure subsequent steps
40.3.9 Step 5: Publish the flow
- Select Publish to create a published version of the current draft. Publishing enables the flow by default.
- The published version is immutable. Later edits create a new draft; publish again to create a new published version. Earlier published versions remain in Versions history.
- Use the header Runs control for actual flow executions. A step’s Test Step result is not a published worker run. Run Flow is available for a published manual-trigger flow.
To disable a published flow, switch its status off and confirm Turn off. Canceling the confirmation leaves the flow enabled.
40.4 Using Templates
40.4.1 Browsing templates
From the Automations home page, choose Use Templates or open All templates. The dialog supports search by template name or description, a category carousel for official templates, and preview cards. Select Use Template from a preview to create a flow from that catalog item.
40.4.2 Template categories
The catalog contains 43 domain templates and 8 starter templates (51 distinct templates). Domain-template category tags can overlap:
| Category | Count | Examples |
|---|---|---|
| Knowledge | 11 | FAQ answer, gap analysis, policy Q&A |
| Reports | 11 | Executive summary, postmortem, release notes |
| Research | 10 | Competitor analysis, market intelligence, regulatory monitoring |
| Review | 8 | Content review, code review, vendor evaluation |
| Approvals | 5 | Change request review, security review gate |
| 4 | Alert notification, weekly knowledge summary | |
| Data | 3 | Data enrichment, record summarization, deduplication |
| Legal | 1 | Legal clause summarizer |
| HR | 1 | Job description generator |
40.4.3 Creating a flow from a template
Open the template preview and choose Use Template. Configure workspace-specific requirements, such as model visibility, agent availability, or email recipients, then review and test the draft before publishing.
40.4.4 Reusing custom flows
Use the flow Export and Import controls to reuse a custom graph. Review its workspace-specific settings in the destination before publishing. These controls reuse flow graphs; they do not create catalog templates.
40.5 Testing and Debugging
40.5.1 Testing individual steps
- Select a step on the canvas
- Click “Test Step” in the test panel
- The step executes and displays the output
- Use the output to configure the next step
40.5.2 Loading run data into tests
If a step failed in a previous run, you can load the actual run’s step input into the test panel:
- Open Runs in the builder header to show Recent Runs in the right panel.
- Select the run and step.
- Choose Load into test to seed the step input, then edit the input and test that step again.
40.5.3 Viewing run history
The header’s Runs control opens Recent Runs in the resizable right panel. Select an execution to inspect its steps, inputs, outputs, and errors. Version history is separate: open Versions from the header’s Actions menu.
40.5.4 Cancelling runs
- Running runs cannot be cancelled (they must complete or time out)
- Queued runs can be cancelled from the run list
- Paused runs (waiting for approval) can be cancelled
40.6 Using AI to Generate Flows
40.6.1 AI flow generation
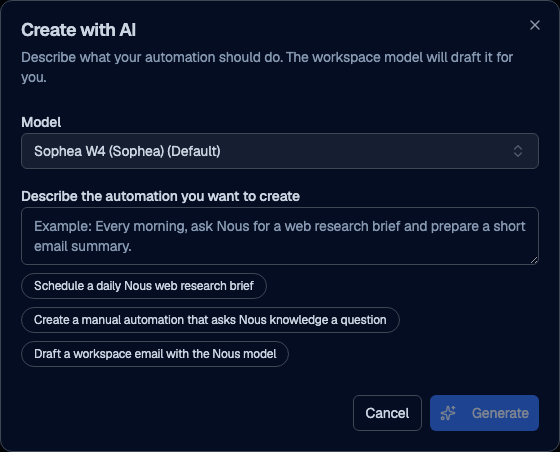
Instead of building a flow manually, you can describe what you want in natural language:
- Click Create with AI in the builder home page.
- Choose Workspace default or a visible explicit model.
- Describe the workflow you want to create.
- Review the generated draft graph, then test and edit it as needed. Generation does not guarantee a working flow.
40.6.2 Tips for AI flow generation
- Be specific about the trigger (e.g., “Run daily at 9 AM” or “When a webhook is received”)
- Mention which Sophea actions you want (e.g., “Search the knowledge base and send an email”)
- Include the expected input and output format
- The AI uses the Sophea piece actions, so describe the workflow in terms of knowledge search, AI model, email, etc.
40.6.3 Refining a generated flow
After the AI generates a flow, you can iterate on it with follow-up instructions instead of starting over:
- Click Refine with AI in the flow builder header.
- Describe the change you want, for example
Add an email step after the knowledge searchorChange the schedule to weekly. - Confirm Workspace default or choose a visible explicit model, then click Refine.
- Review the updated flow and continue refining or publish.
You can refine multiple times. Each refinement builds on the current state of the flow, so you do not need to restart when you want to make adjustments.
Generate and Refine refresh the available models when opened and again when you submit. If your selected model was hidden or removed in between, Automations stops the request and refreshes the selector. Review the new selection and click again; it does not change the model silently.
40.7 Choosing models in workflow steps
Model-capable Nous actions offer Workspace default and the visible explicit models available to your Workspace.
- Workspace default is recommended for most flows. The saved flow follows the live Workspace default on every run.
- An explicit model remains pinned while that model is visible. If an administrator later hides it, the saved flow uses the current Workspace default and records the requested model, executed model, and fallback reason in the run details.
- A missing, deleted, malformed, non-CHAT, or different-Workspace model ID fails before a provider call. Refresh the model list and select a currently visible model before retrying.
During the Sophea piece v0.0.2-to-v0.0.3 migration, saved explicit model choices on upgraded ask_nous_knowledge, ask_workspace_model, and llm_approval nodes reset to Workspace default; the obsolete Knowledge chunks to inspect (limit) setting is removed from older Answer from knowledge steps. Current v0.0.3 nodes retained by upgrade safety checks are not rewritten. Review the upgraded draft before publishing, and select a visible explicit model again only if the flow should stay pinned.
40.8 Approvals
40.8.1 Human-in-the-loop approvals
The request_human_approval action pauses the flow for a decision from selected active Portal Workspace members. Configure Approval request, Approvers, and Decision deadline. The deadline defaults to 24 hours; choose 1 hour, 24 hours, or 7 days. Any selected approver can decide. After expiry, the approval cannot be decided and the action does not resume the flow; start a new approval request if the process should continue.
The separate Nous action Create approval task (create_approval_task) accepts Prompt, Approvers, and optional Details. It pauses until a decision or expiry, but its seven-day expiry is fixed; it does not expose Decision deadline. After expiry, the action does not resume the flow.
After a decision, both human approval actions complete with approved (boolean), decision (APPROVED or REJECTED), comment, and decided_by_user_id. Rejection does not automatically stop subsequent flow steps, so add explicit branching when rejected requests must not continue.
40.8.2 LLM approval gates
The Review with AI action (llm_approval) evaluates Review target against Review instruction using a visible Workspace model. Model override defaults to Workspace default, and Confidence threshold (confidenceThreshold) defaults to 0.75. Outputs include decision (APPROVED, REJECTED, or NEEDS_HUMAN_REVIEW), approved, and needs_human_review. Add a Router or other conditional flow control to route each outcome explicitly; the approval action does not itself select downstream branches.
40.8.3 Approval workbench
Open Approvals for the selected workspace and use Pending or History to inspect requests. Decision controls appear for a pending request when you are eligible to decide. Enter the required comment, then choose Approve or Reject. Check the recorded decision and the flow’s continuation separately; an email link alone does not prove delivery or a resumed run.
40.9 Email
40.9.1 Sending workspace emails
The send_workspace_email action sends through the Nous SMTP configuration. Recipients defaults to RUN_USER (the flow runner); WORKSPACE_MEMBERS provides a selector of active Portal Workspace members. Set the subject and body, and choose markdown (the default) or plain_text for bodyFormat.
The action can return sent or partial with refused recipients. Check the recipient mailbox separately to confirm actual delivery.
40.9.2 Common email patterns
- Daily brief: Schedule trigger + ask_workspace_model + send_workspace_email
- Alert notification: Webhook trigger + ask_workspace_model + send_workspace_email
- Weekly summary: Schedule trigger + ask_nous_knowledge + send_workspace_email