The SharePoint connector can index a whole Microsoft 365 tenant or a narrow set of sites, libraries, folders, and files. This chapter is for workspace admins and Microsoft 365 admins who must choose the correct sign-in method, configure Microsoft Entra permissions, and verify document access.
9.1 Choose the setup path
Choose the path before you create the connector. The choice controls who owns the Microsoft app and whether Nous can mirror SharePoint permissions.
Setup path
Microsoft app owner
Document access
Best for
Managed by Sophea
Sophea
Public or Private
The fastest setup when the signed-in user’s SharePoint access is enough
Self-managed Client Secret
Your organization
Public or Private
Organization-controlled app-only indexing without permission sync, set up in Portal or Nous
Self-managed Certificate Authentication
Your organization
Public or Private in Portal or Nous. Sync permissions in Nous only
Organization-controlled app-only indexing without a client secret, or, in Nous, indexing that must mirror SharePoint users and groups
Important
Sync permissions requires Certificate Authentication. A Client Secret credential cannot use this access mode. Microsoft Entra receives the public certificate. Sophea receives the matching password-protected PFX file. Portal does not offer Sync permissions, so choosing Certificate Authentication in Portal does not turn it on. Create the connector in Nous to use Sync permissions.
9.2 Before you start
Prepare these roles and values:
a Sophea Nous workspace admin who can create credentials and connectors
a Microsoft Entra admin who can create app registrations, add application permissions, and grant tenant-wide admin consent
the Microsoft 365 tenant ID, also called the Directory ID
an account that can confirm which SharePoint sites should be indexed
for certificate authentication, a secure location for the PFX file and its password
Use a dedicated Entra app registration for the connector. Do not reuse a user account password or a certificate used by an unrelated application.
9.3 Managed by Sophea
Use this path when you do not need SharePoint permission sync.
In Nous, open Connectors, select Add Connector, and choose SharePoint under Managed by Sophea.
Select Connect with SharePoint.
Sign in to Microsoft and approve the requested delegated permissions.
Choose the sites, libraries, folders, or files to index.
Set Who has access to Specific Teams unless the content is intended for every member of the workspace.
Create the connector and complete the verification.
This path uses the signed-in person’s SharePoint access. It does not ask you for a client ID, client secret, public certificate, or PFX file. It does not offer Sync permissions.
9.4 Portal customer form fields
Portal first asks how this workspace should connect, then shows the form.
Choose a SharePoint connection method in Portal.
Choice
Who the connector acts as
What Portal asks for
Sign in with SharePoint
The person who clicks Connect
Nothing. You approve access in Microsoft
Use your organization’s own SharePoint credential
The organization
Client ID and Directory ID, plus either a client secret or a certificate
Choose the organization credential for a shared connector. A personal sign-in indexes only what that person can see. It keeps working until Microsoft stops accepting that person’s sign-in, even after you remove them from the workspace. Nous does not delete that person while such a connection still signs in as them: delete the connection or reconnect it with another account first (see Delete a synchronized user).
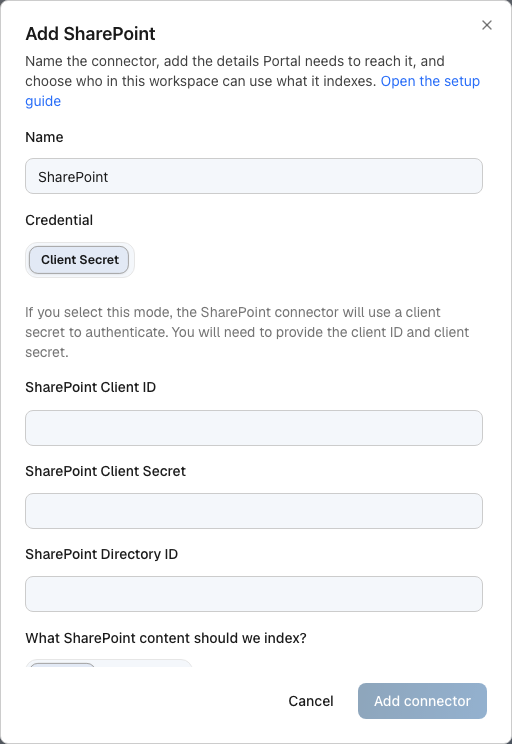
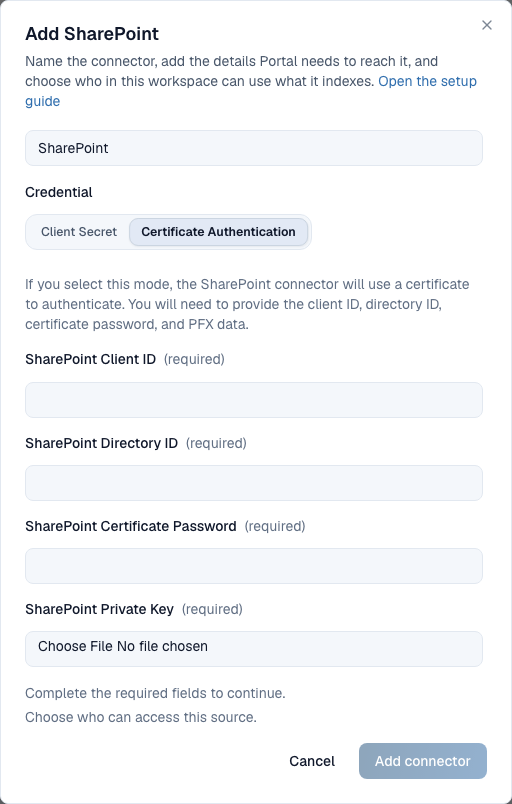
The organization credential has two tabs. Client Secret is selected by default. Choose Certificate Authentication to sign in with a certificate instead.
Tab
What Portal asks for
Client Secret
SharePoint Client ID, SharePoint Client Secret, and SharePoint Directory ID
Certificate Authentication
SharePoint Client ID, SharePoint Directory ID, SharePoint Certificate Password, and a PFX file in SharePoint Private Key
The form then shows Name, the SharePoint scope fields, and Who has access. Choose Everyone in the workspace or Specific Teams.
SharePoint client-secret form before any credential is entered.
SharePoint certificate form before any credential is entered.
Field
What to enter
Name
A unique connector name.
SharePoint content
In Browse, choose sites, libraries, folders, or files. Leave empty for all visible sites.
Sites
In Paste URLs, enter SharePoint site or folder URLs, one per line.
Index Documents
Keep enabled to index documents in the selected scope.
Index ASPX Site Pages
Enable only when SharePoint site pages must be indexed.
Treat sharing links as public?
Enable only when anonymous or organization-wide sharing links should be visible to every Nous user.
Excluded Sites
Optional site URLs or glob patterns to skip.
Excluded Paths
Optional file or folder glob patterns to skip.
Authority Host
Default https://login.microsoftonline.com.
Graph API Host
Default https://graph.microsoft.com.
SharePoint Domain Suffix
Default sharepoint.com.
Who has access
Everyone in the workspace or Specific Teams.
Client Secret and Certificate Authentication are both available in Portal, as the organization credential above, and in Nous. Portal does not offer Sync permissions. Use the certificate path in Nous when the customer must mirror SharePoint users and groups.
9.4.1 Certificate files in Portal
On the Certificate Authentication tab, the PFX file must:
contain the private key
be protected with a password, which you enter in SharePoint Certificate Password
have the .pfx extension
be 10 KB or less
You still upload the matching public certificate (.cer, .pem, or .crt) to the Entra app registration. Portal never needs it.
Portal stores the PFX file and its password encrypted. They are never shown again, and a later replacement form starts with empty fields. Before it creates the connector, Sophea checks the certificate against Microsoft. A wrong password, an unreadable file, or a Client ID or Directory ID that does not match the app registration shows a validation error, and the connector is not created. Correct the value and submit again.
9.5 Create a self-managed Entra app
Use this setup for Client Secret or Certificate Authentication.
Go to Identity > Applications > App registrations.
Select New registration.
Enter a clear name such as Sophea Nous SharePoint Production.
Select Accounts in this organizational directory only.
Register the app. A redirect URI is not required for this app-only flow.
Record the Application (client) ID and Directory (tenant) ID.
Open API permissions > Add a permission and add the permissions for the access mode you will use.
Microsoft resource
Application permission
Public or Private
Sync permissions
Microsoft Graph
Sites.Read.All
Required
Required
Microsoft Graph
GroupMember.Read.All
Not required
Required
Microsoft Graph
User.ReadBasic.All
Not required
Required
Office 365 SharePoint Online
Sites.FullControl.All
Not required
Required
The permission type must be Application, not Delegated. Select Grant admin consent for your tenant after all required permissions are listed. A green Granted for your tenant status must appear for each one.
Warning
Microsoft Graph and Office 365 SharePoint Online are separate resources in the permission picker. Adding Sites.FullControl.All under Microsoft Graph does not replace the Office 365 SharePoint Online permission required by permission sync.
9.6 Use a client secret
Use a client secret only for Public or Private indexing.
In the Entra app, open Certificates & secrets > Client secrets.
Select New client secret, choose an expiry that follows your company policy, and create it.
Copy the secret Value immediately. Do not copy the Secret ID.
In Portal, choose Use your organization’s own SharePoint credential. In Nous, choose Use your own Microsoft app and create a credential.
Keep Client Secret selected. Enter the Client ID, Client Secret, and Directory ID.
Save the credential. Select Public or Private document access when you create the connector.
If the connector must use Sync permissions, create a separate Certificate Authentication credential in Nous. Adding more permissions does not make a Client Secret credential eligible for Sync permissions.
9.7 How certificate authentication works
One certificate creates two files with different jobs:
File
Contains
Upload destination
Safe to share?
.cer, .pem, or .crt
Public certificate only
Microsoft Entra app registration
Yes, it has no private key
.pfx
Certificate and private key
Portal or Nous credential form
No, protect it and its password
Sophea signs an application request with the private key inside the PFX file. Microsoft Entra verifies that signature with the public certificate registered on the app, then returns an application token.
Important
Do not upload the PFX file to Microsoft Entra. Do not give the PFX file or its password to users. Sophea currently requires the PFX upload and does not read the private key directly from Azure Key Vault.
9.8 Generate a staging certificate
Use a self-signed certificate for staging or a short test.
9.8.1 Windows PowerShell
Run these commands as the account that will export the files:
$cert= New-SelfSignedCertificate `-Subject "CN=Sophea Nous SharePoint Staging" `-CertStoreLocation "Cert:\CurrentUser\My" `-KeyAlgorithm RSA `-KeyLength 2048 `-HashAlgorithm SHA256 `-KeyExportPolicy Exportable `-NotAfter (Get-Date).AddYears(1)$certificatePassword=Read-Host"Enter a password for the PFX file"-AsSecureStringExport-Certificate `-Cert $cert `-FilePath ".\sophea-sharepoint-staging.cer"Export-PfxCertificate `-Cert $cert `-FilePath ".\sophea-sharepoint-staging.pfx" `-Password $certificatePassword$cert|Select-Object Subject, Thumbprint, NotAfter(Get-Item".\sophea-sharepoint-staging.pfx").Length/ 1KB
The final command shows the PFX size in KB.
9.8.2 macOS or Linux with OpenSSL
Run these commands in a terminal. OpenSSL asks you to protect the private .key file, then asks for the export password for the PFX file:
Use the PFX export password when Portal or Nous asks for the certificate password. The final command shows the exact PFX size in bytes. It must be 10,240 bytes or less.
Upload only sophea-sharepoint-staging.crt to Microsoft Entra. Upload sophea-sharepoint-staging.pfx to Portal or Nous. Never upload the private sophea-sharepoint-staging.key file to either system. Store or remove the private key according to your organization’s secrets policy after you confirm that the PFX works.
For both methods, keep the PFX password out of command history, tickets, chat, and source control. The PFX upload must be a .pfx file of 10 KB or less.
For production, request a certificate from your company certificate authority or approved public key infrastructure. Follow these requirements:
RSA key with at least 2048 bits and SHA-256 signing
an exportable private key, because Sophea must receive a PFX file
a password-protected PFX file of 10 KB or less
a public .cer, .pem, or .crt file from the same certificate
an expiry date recorded in your certificate inventory and monitoring process
Store the PFX file and password through your normal secrets process. Keep them in separate controlled locations when company policy requires it. A company certificate authority may include a certificate chain in the PFX. Confirm that the final file still meets the 10 KB size limit before the change window.
Microsoft recommends a certificate issued by a trusted certificate authority for production. See Certificate credentials.
9.10 Upload the public certificate to Entra
Open the Entra app registration.
Go to Certificates & secrets > Certificates.
Select Upload certificate.
Upload the public .cer, .pem, or .crt file. Do not upload the PFX.
Record the displayed thumbprint and expiry date.
Confirm the thumbprint and expiry match the certificate you generated or received from your certificate team.
An Entra app can hold more than one active certificate. This allows safe rotation with an overlap period.
9.11 Upload the matching PFX in Portal
In Portal, choose the workspace, open Connectors, and add a SharePoint connector.
Choose Use your organization’s own SharePoint credential.
Select the Certificate Authentication tab.
Enter SharePoint Client ID and SharePoint Directory ID from the Entra app.
Enter the password used when the PFX was exported in SharePoint Certificate Password.
Upload the matching file in SharePoint Private Key. It must end in .pfx and be 10 KB or less.
Complete the scope and Who has access fields and create the connector.
The public certificate in Entra and the PFX in Portal must come from the same certificate. The PFX password must match the password used during export. Portal offers Public or Private access only. For Sync permissions, use Nous.
9.12 Upload the matching PFX in Nous
Use this path in the Nous admin UI when the connector must use Sync permissions.
In Nous, open Connectors, select Add Connector, and choose SharePoint.
Select Use your own Microsoft app.
Create a credential and choose Certificate Authentication.
Enter the SharePoint Client ID and SharePoint Directory ID from the Entra app.
Enter the password used when the PFX was exported.
Upload the matching file under SharePoint PFX File. It must end in .pfx and be 10 KB or less.
Save and select the credential.
The public certificate in Entra and the PFX in Nous must come from the same certificate. The PFX password must match the password used during export.
9.13 Select SharePoint content
The connector provides two ways to select content:
Browse: search and expand sites, document libraries, and folders. Select any scope down to an individual file. Unsupported files remain visible but cannot be selected.
Paste URLs: enter site or folder URLs when browsing is not convenient. URL parsing currently supports English, Spanish, and German SharePoint site paths.
Leave the selection empty to index every site visible to the connected app or account. Use a narrow selection when the workspace needs only a defined part of the tenant.
Selecting a site, library, or folder includes supported documents below it. Supported documents include PDF, Office files including legacy .doc, .ppt, .rtf and .xls, text and web formats, images, and CAD drawings (.dwg, .dxf). For unusually complex drawings, see Complex CAD drawings. Files of any other type are listed under Files not indexed on the connector page with the reason, and are never counted as errors. Files larger than 2 GB are listed there too. An individual file selection includes only that file. Renaming that file or moving it inside the same library keeps it selected. A successful refresh removes it if it is deleted, access is permanently removed, or it moves to another library. A temporary Microsoft service failure does not remove the previously indexed copy.
A file deleted in SharePoint leaves search at the next successful refresh, whether the connector indexes a site, a library, a folder, or that file alone. Deleting a folder removes the files inside it. A file restored from the SharePoint recycle bin returns to search at the next refresh. Microsoft occasionally asks Nous to read a library again from the start; when that happens on the first refresh after a restore, the restored file returns only after someone edits, renames, or moves it. If a removal is missed, the connector’s regular cleanup removes the file within 30 days.
Older SharePoint files within the selected content are included regardless of the former shared indexing start date. Existing connections that used that setting discover the missing history automatically after the upgrade. Their sites, folders, exclusions, and document permissions do not change. Follow Indexing status and testing to check progress and verify a historical file in search.
9.14 Find files while indexing continues
Knowledge Search can also find authorized SharePoint files while this connector is still discovering or indexing content. It combines available indexed evidence with up to 25 file matches from Microsoft search. These matches show the file name and location; they do not mean Nous has read the file’s contents.
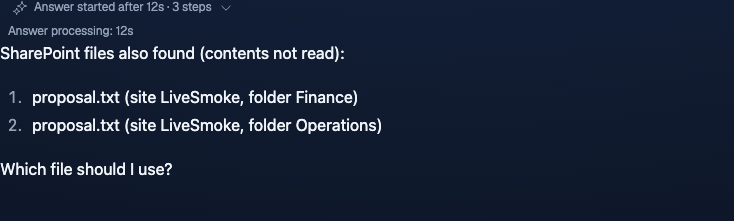
Ask for one file by its exact name to let chat read that file and answer in the same turn. If several files match, chat shows numbered choices with site and folder context. Select a number or say “summarize the second one,” including after reopening the chat. Chat reads only that one selected file and checks access again before using its contents. Large, scanned, unsupported, or unreadable files can still appear as matches, but the answer states when their current contents could not be read.
Chat lists two matching SharePoint files and asks which one to use.
The connection’s site, library, folder, file, and exclusion selections still apply. A personal sign-in serves only its owner. Shared connections follow current workspace or Team access. With Sync permissions, a file remains hidden until Nous has both its document record and current permission evidence for that exact connection; completed search indexing is not required. A site or library this connection cannot open is skipped: chat still lists matches from the others and says that some locations could not be checked. A search that runs out of time says so too. Narrow the request to a site or library for a more complete check. Microsoft search can itself take time to find a newly uploaded file.
9.15 Choose document access
Access mode
Search visibility
Supported credentials
Public
Every workspace member can retrieve indexed content
Managed OAuth, Client Secret, or Certificate
Private
Only supported Nous users or Portal Teams can retrieve indexed content
Managed OAuth, Client Secret, or Certificate
Sync permissions
Search mirrors SharePoint users, groups, site admins, inherited grants, and supported public grants
Self-managed Certificate Authentication created in Nous only. Portal does not offer it
Site admins can find all content in the sites they administer, the same access SharePoint and Microsoft 365 Copilot already give them. Review each site’s admin list before you enable Sync permissions. After someone is removed from a site’s admins, the next successful group sync removes the access they had through that role. Any other SharePoint access they hold, granted directly or through a group, stays in effect. In Current access in Nous, this access appears as an entry ending in |siteadmins.
Choose Sync permissions when you create the connector, before indexing starts. After indexing starts, delete and recreate the connector to change from Public or Private to Sync permissions.
Once a connector uses Sync permissions, its access mode cannot change to Public or Private. Recreate the connector to leave permission sync.
SharePoint group membership refreshes about every five minutes. Document access entries refresh about every thirty minutes. The Uses source permissions badge identifies the access mode. It does not prove that a run finished. Open the connector detail page and check Last completed permission sync. Not completed yet means no successful permission sync has finished. Expand Current access in Nous to inspect a small sample of stored document access.
If SharePoint returns a recognized folder-specific permission error or an inconsistent folder location, the affected folder and its subfolders retain their last synchronized folder access for the current pass. Other folders can continue refreshing. Files whose permissions can still be read continue to refresh, including files beneath those folders. A completed pass does not mean every folder’s permissions refreshed. Unreadable folders are checked again on the next pass. An unexpected permission-sync error stops the current pass; stored access remains until a later successful pass can refresh it.
New documents without synchronized permissions remain hidden. Unknown or unsupported permission entries grant no access.
Warning
Treat sharing links as public? is off by default. Enable it only when anonymous and organization-wide SharePoint sharing links should make a document searchable by every Nous workspace member.
9.16 Advanced settings
The SharePoint form provides these advanced settings:
Index Documents: on by default
Index ASPX Site Pages: off by default
Treat sharing links as public?: off by default
Excluded Sites and Excluded Paths: optional glob patterns
Authority Host: https://login.microsoftonline.com
Graph API Host: https://graph.microsoft.com
SharePoint Domain Suffix: sharepoint.com
For Microsoft 365 GCC High or DoD, use the hosts approved for that tenant. The current form documents https://login.microsoftonline.us, https://graph.microsoft.us, and the GCC High suffix sharepoint.us. Confirm the correct cloud with your Microsoft 365 administrator before creating the connector.
9.17 Exclude files or sites
Exclusions stop SharePoint content from being indexed when it cannot be removed or moved at the source.
Open the SharePoint connector detail page.
In Connector configuration, select Edit excluded paths and sites.
Enter one pattern per line, such as report.pdf, *.tmp, ~$*, or Archive/*, under Excluded Paths. Matching is case-insensitive.
Enter a safe site pattern such as *://*/sites/archive-* under Excluded Sites.
Select Save for future refreshes, or Save and prune now to remove matching indexed copies.
Do not enter customer filenames, tenant names, private URLs, or secrets in a screenshot or example.
9.18 Verify the connector
Complete all checks before you give the connector to users:
Open the site browser. Confirm the intended sites and libraries appear.
Confirm Sync permissions is enabled only for a Certificate Authentication credential.
Create the connector. A failed permission check must be corrected before the connector is accepted.
Wait for source sync and search indexing to complete.
For permission sync, wait until Last completed permission sync shows a real time.
Search for a known SharePoint document as a user who has source access.
Repeat the search as a user who does not have source access. The document must not appear.
If sharing links are treated as public, verify that decision with a normal workspace member who has no direct SharePoint grant.
Do not treat successful site discovery as a complete access test. Site listing, document indexing, and permission sync use different Microsoft permissions.
9.19 Troubleshooting
What you see
Likely cause
What to do
The certificate note appears before creating the connector
A self-managed Client Secret credential is selected
This is a setup note. Use Public or Private, or create a Certificate Authentication credential in Nous for Sync permissions.
Sync permissions is not shown
The connector uses Managed by Sophea OAuth
Use Public or Private, or recreate it in Nous with a self-managed certificate credential.
Sync permissions is disabled
A Client Secret credential is selected
Upload the public certificate to Entra and the matching PFX to a Nous certificate credential.
Sync permissions is not offered when you add the connector in Portal
Portal offers Public or Private access only, including with Certificate Authentication
Create the connector in Nous with a Certificate Authentication credential.
“The Client ID does not match the app registration this certificate belongs to. Use the Application (client) ID of the exact Entra app registration where the public certificate was uploaded, and check the Directory (tenant) ID.”
The certificate is registered on a different Entra app registration, or a wrong Client ID was entered
Use the Application (client) ID of the app registration that holds the public certificate (.cer), and check the Directory (tenant) ID.
“Microsoft could not verify the certificate signature. Upload the public certificate (.cer) that matches this PFX to the Entra app registration’s Certificates list, and replace it if it expired.”
The PFX private key has no matching public certificate on the app registration, or that certificate expired
Upload the public certificate (.cer) that matches the PFX to the Entra app registration’s Certificates list, and replace it if it expired.
“The client secret was rejected. Paste the secret VALUE from Entra, not the secret ID; create a new secret if it expired.”
The secret value is wrong or expired
Paste the secret VALUE from Entra, not the secret ID; create a new secret if it expired.
No sites appear
Sites.Read.All is missing or lacks admin consent
Add Microsoft Graph Application Sites.Read.All, grant tenant-wide admin consent, and retry.
Site role assignments cannot be read
Sites.FullControl.All is missing or was added under the wrong resource
Add Office 365 SharePoint Online Application Sites.FullControl.All, grant admin consent, and retry.
Group membership cannot be read
GroupMember.Read.All is missing
Add Microsoft Graph Application GroupMember.Read.All, grant admin consent, and retry.
People find only some files shared through Entra groups, or the Nous alert or the Portal connector page says permission sync cannot read who is in Microsoft Entra groups
User.ReadBasic.All is missing
Add Microsoft Graph Application User.ReadBasic.All, grant admin consent, and retry. Group membership refreshes on the next group sync; no re-indexing is needed.
Portal or Nous rejects the upload, or reports “Failed to load the SharePoint certificate. Verify the PFX and certificate password are correct.”
The file is not a PFX, is larger than 10 KB, is corrupt, does not contain an exportable private key, or the entered PFX password does not match
Export a valid password-protected .pfx of 10 KB or less from the same certificate registered in Entra, and re-enter its exact password.
Portal shows a validation error after you submit a certificate, and the connector is not created
The password, the file, the Client ID, or the Directory ID did not pass the check against Microsoft
Correct the value and submit again. Nothing is created until the check passes. When you replace a certificate, the existing credential keeps working.
Nous reports that no site is available for validation
The app can authenticate but no site can be discovered
Select at least one site and confirm the app has access to it.
Needs attention lists a site with “This connector’s account or app is not allowed to open this location.”
SharePoint refused the connected account or app for that site; the other sites are still indexed
Grant the connected account or app access to that site in SharePoint, or remove the site from the connector’s selection. After granting access, select Run full re-index so the site’s files are indexed; the entry stays under Needs attention until that re-index completes. For a connector that syncs SharePoint permissions, permission sync still finishes for the locations it can open. While a location is blocked, files the sync could not read there are hidden from people who see them through SharePoint permissions, until a later sync can read them again; a Team given the whole connector still sees them.
Last completed permission sync shows Not completed yet
No successful permission run has completed
Check the connector error state and the four required application permissions.
9.20 Rotate the certificate
Start rotation 30 to 60 days before expiry:
Generate or receive the replacement certificate and matching PFX.
Upload the new public certificate to the existing Entra app. Keep the old certificate active.
Replace the certificate credential with the new PFX and password:
In Portal, open the connector, select the Connection tab, and choose Replace credential. When the card shows Change credential instead, choose it, then choose the update option that names the credential. See Replace a credential from Portal.
In Nous, update the certificate credential.
Test site discovery and the connector’s next sync. For a connector that uses Sync permissions, also test permission sync.
For Sync permissions, confirm Last completed permission sync advances and run the authorized and unauthorized user search checks.
Remove the old certificate from Entra only after the new credential works.
Remove the old PFX and password according to your secrets-retention policy.
If Portal cannot validate the replacement, for example because of a wrong password, an unreadable file, or IDs that do not match the app registration, it shows a validation error and the existing credential stays in use. Replacing a credential updates every connector that uses it.
Do not delete the old Entra certificate before Sophea uses the replacement. The overlap prevents an avoidable indexing outage.