28 Agents
Agents give your users a prepared assistant instead of a blank chat. An agent bundles instructions, knowledge, tools, and starter prompts behind a single name so non-technical users get a guided experience.
There are two flows in the product, and you need to keep them separate in your head:
- Published Sophea agents ship inside the platform. Presentation Agent, Financial Agent, Web Search, and others are available here. Your Portal administrator chooses which Sophea-published agents are available in your workspace via the
external_agentsfeature. You do not build these inside Nous, and you do not attach document sets to them from the workspace. - Workspace-created agents are agents you build inside Nous. They use your own document sets (see Document sets), your own actions, and your own instructions. This is the flow the rest of this page walks you through.
If you only need ad-hoc exploration, plain workspace chat is enough. Reach for a workspace-created agent when the same task needs to be repeated by several users with the same scope and tone.
In the chat composer, the Agents control opens a menu with a search box, Deep Research on top, the workspace agents and, before the first message, the agents people made. A person-made agent shows Created by you or Created by and the creator’s email address. Pick up to four workspace agents; a message can use up to four agents. A person-made agent can be picked one at a time, before the first message. Picking Deep Research while agents are selected asks for confirmation, because Deep Research runs alone for that message. The control reads Agents when nothing is selected. With a selection it shows the agent’s name when one agent is selected, “N agents” when several are (hover it to see their names), and Deep Research when that mode is on. Its x turns off every selected agent and Deep Research at once. Browse all agents at the bottom of the menu opens the Agents page, and New agent starts a new agent. Published workspace agents run with the default assistant, so they show as unavailable while a chat uses one of the workspace’s other agents. A selected agent stays selected for subsequent messages in the same chat, including when a run continues in the background. Turn an agent off in the menu, or use the control’s x to turn them all off, when you no longer want to use them. Switching chat, assistant, or project context can clear the selection, as can choosing Deep Research. When you start a chat from the Agents page, that agent stays on for the whole chat; to use a different one, start a new chat.
For ordinary-chat preparation and completed-response measurements, see answer timings. Published-agent activity summaries and Deep Research plan/report timing have their own scope; they are not pure model-thinking time or HTTP request duration.
28.1 Temporary workspace connection
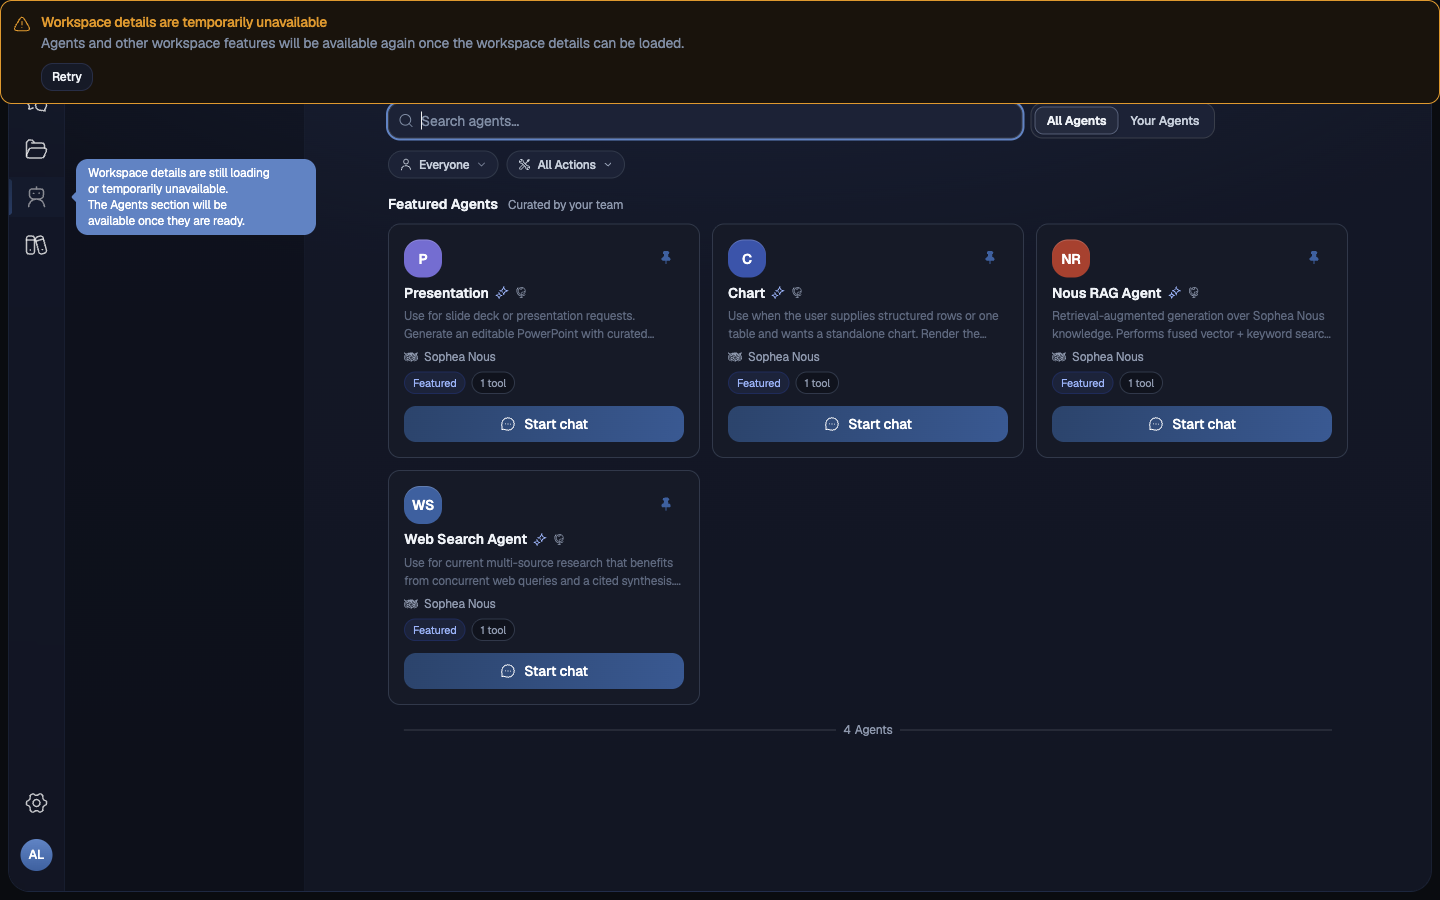
If workspace details are temporarily unavailable, the Agents shortcut stays visible but cannot be selected. Your current page and chat stay open. Wait for the connection to recover, or select Retry in the workspace-details message.
This is different from Agents being disabled for the workspace. When Agents is disabled, its sidebar shortcut is hidden.
28.2 Projects
Projects let users group related chats under a shared set of instructions and context files. Instead of starting every conversation from scratch, a project carries its own instructions and uploaded files into every chat opened under it.
Click the Projects icon in the main left sidebar to open the projects panel. Click the icon again to hide the panel, or point at the panel’s edge and click the arrow that appears. Once the panel is hidden, the same arrow on the sidebar edge brings it back. Once you have five or more projects, the panel header also offers search, and sorting and filtering by owner.

To create a project:
- Click the + button (New project) in the projects panel header.
- Give the project a name.
- Add shared instructions in the instructions field. These apply to every chat opened inside the project.
- Upload any context files the project should always have available.
- Save.
Once a project exists, open a new chat from inside it. All chats in that project inherit its instructions and files automatically.
Use projects when a team member regularly works in the same context, for example a standing client engagement, a recurring research topic, or an ongoing audit. Projects reduce the overhead of re-establishing context at the start of every session.
28.2.1 Project Team-share notifications
When a Project is shared with a Portal Team, Nous sends an email and adds one in-app Team-share notification for each active Team member who newly gains access to that Project. The recipient is the Team member, not the person who shared it. A member who already has access directly or through another active Team receives no duplicate. The actor, workspace admins who already have access, inactive Team members, and users in another tenant are not recipients.
Find the in-app inbox by clicking your sidebar avatar and choosing Notifications. The avatar badge and the Notifications row show the unread Team-share count. Opening the inbox refreshes access but never dismisses a row. Click Dismiss notification to clear unread state; the row remains in history and the dismissal persists across refreshes and sign-in.
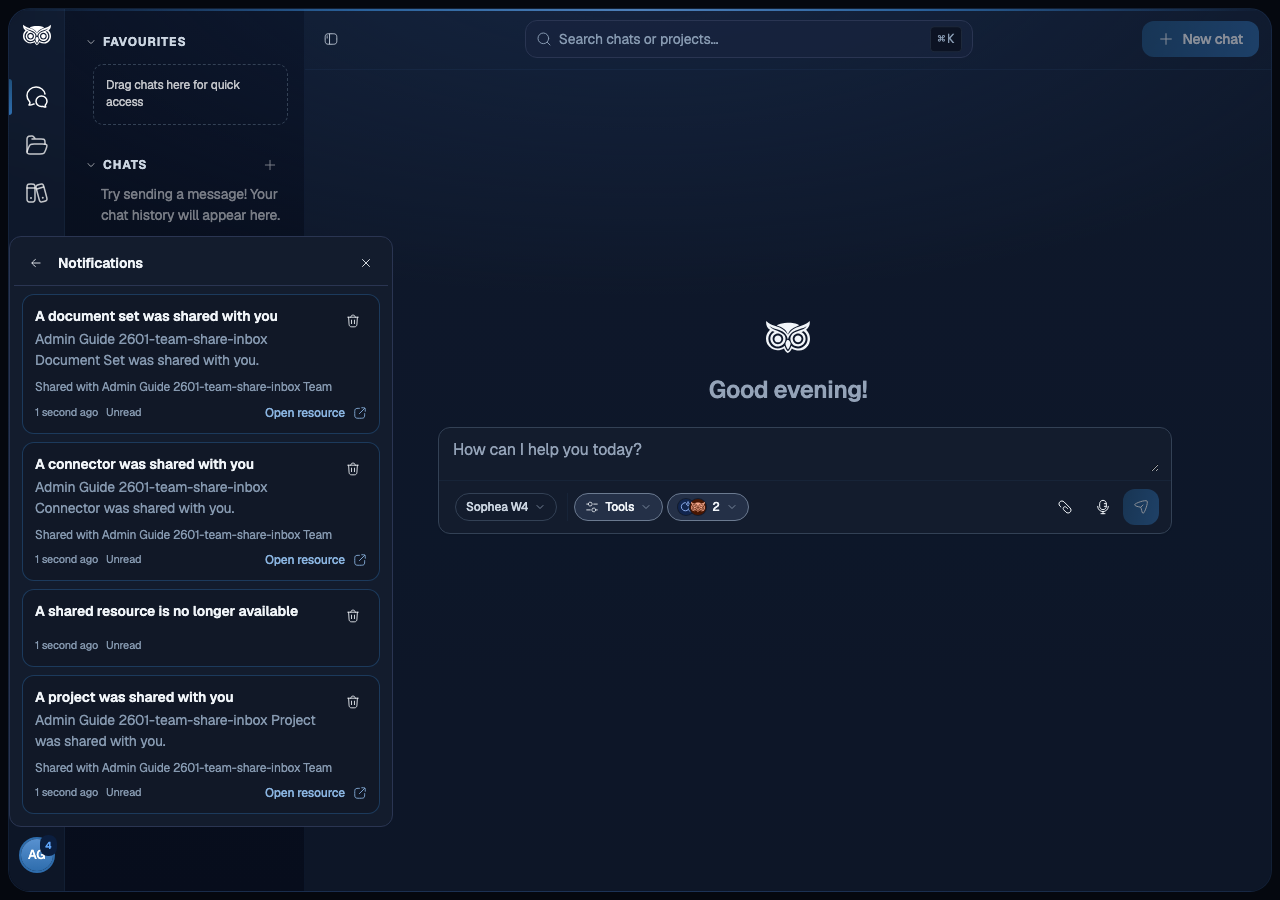
The inbox covers Team-share events for Projects, private Connectors, private Document Sets, and private agents. An accessible Project row shows its link, the Team names associated with the share, and received time. Retrying one Team-share mutation is deduplicated. Removing a Team and sharing the Project with it again creates a new grant and a new event. If a Project or its access is revoked, the old row remains but a fresh open-time check removes the Project name, file details, Team names, and link. It shows only safe unavailable wording. A later regrant creates a new event and does not restore details in the old row.
Project sharing grants access only to that Project. The notification and email report that grant; they do not extend access to other Projects, connectors, document sets, or agents.
28.3 Create an agent
Open Agents from the workspace navigation and click New Agent, or navigate to /app/agents. Workspace admins can also create and manage agents from /app/admin/agents. The editor opens with fields for identity, instructions, knowledge, and tools.

Fill in the identity fields first:
- Name. Short and verb-led when possible, for example
HR Policy AssistantorFinance Helper. The name is what end users see in the agent picker. - Description (optional). One sentence on what this agent is for. Users see the description in the agent popover, so write it for them, not for yourself.
- Agent Avatar. Pick an icon. This is the visual the picker shows, so make it distinguishable from your other agents.
Keep each agent focused on one job. If you find yourself describing two unrelated workflows, split it into two agents. Multiple small agents almost always beat one large agent.
28.4 Instructions
The Instructions field is the agent’s system prompt. This is where you tell the agent what role it plays, what it should and should not do, and how it should format answers.

Use this rough structure when you write instructions:
- Role. One sentence on who the agent is. “You are the HR assistant for Demo Workspace employees.”
- Scope. What it should answer. “Answer questions about leave policy, payroll dates, and onboarding paperwork.”
- Limits. What it should refuse or escalate. “If the question is about a specific person’s contract or compensation, ask the user to contact HR directly.”
- Format. How long, how cited, what tone. “Answer in bullet points. Always cite the source document when you quote policy.”
Keep instructions under a page. Long prompts dilute the instructions the model actually follows, and they slow every reply. If you need lots of conditional behavior, split it into multiple agents instead.
28.5 Conversation Starters
Conversation Starters are the suggested prompts users see when they open a new chat with the agent. They are pure UX scaffolding, but they make a big difference for first-time users who do not yet know what to ask.
There are two sides to this feature, and they live in different places:
- What users see is the read-only set of starter chips on the chat home screen. Clicking a chip sends that prompt on the user’s behalf.
- Where starters are edited is the Conversation Starters field inside the agent editor. An agent owner can edit their agent, and workspace admins can manage workspace agents from the admin view.

Each starter has a Name (the label on the chip) and a Message (the prompt sent on the user’s behalf when the chip is clicked). Write between three and five starters. Cover the most common things the agent is asked. Pull the wording from real questions in your team chat or ticketing system if you have access to them.
A good set for an HR Policy Assistant might be:
- “How do I check my annual leave balance and request time off?”
- “Summarize the probation period policy for new joiners.”
- “Walk me through filing an expense reimbursement claim.”
Refresh starters every few months. If nobody is clicking them, they are not the right questions.
28.6 Knowledge
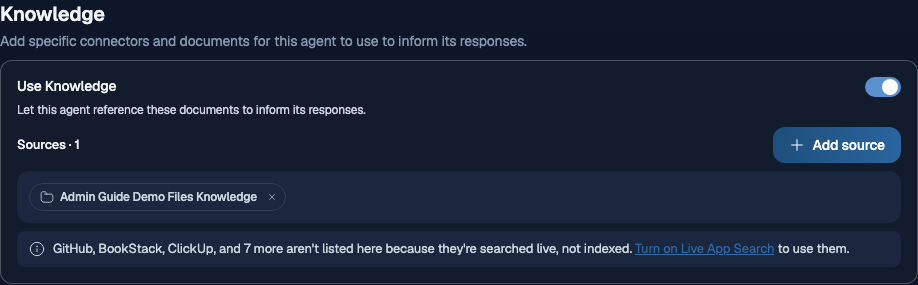
The Knowledge section chooses what the agent searches. When Use Knowledge is enabled, the agent uses the sources you add as its retrieval scope for every question.
Use this sequence to add knowledge:
- Toggle Use Knowledge on.
- Select Add source. The menu lists Document Sets, Your Files, and the indexed sources you can browse.
- Check one or more document sets you have already created and confirmed ready in Document sets, choose files in Your Files, or pick folders and documents in an indexed source.
- Save.
Each choice appears as a chip under Sources. Remove a document set or all selected files with the chip’s remove control. To change a selection, use Add source again, or select the Your files chip to reopen the file list. Turning Use Knowledge off hides the sources without discarding them, so turning it back on restores them.
In Your Files, a file you upload is selected automatically. Add files confirms the selection. Cancel, Esc, or closing the dialog leaves the agent’s files as they were, and anything you uploaded stays in your file library. Add files waits while a selected file is still uploading. A file that fails to upload shows the reason, with Retry when trying again can succeed.
Apps that are searched live, such as Microsoft Teams and Outlook, do not appear in the source menu because they are never indexed. A note under the sources names these apps and gives the next step: connect one under Connectors, or turn on Live App Search under Actions and tools.
A few rules to keep retrieval clean:
- Attach the document set, not the connector. Document sets are the reusable, permissioned scope. A connector is just where the bytes came from.
- One scope per agent when you can. If you attach three unrelated document sets, the agent will mix them. Two agents with one set each often produce sharper answers than one agent with two sets.
- Confirm the set is ready first. A document set that is still syncing will return inconsistent results. Validate it in Knowledge Search before you wire it into an agent.
If your agent does not need any retrieval (for example, a pure tone-rewriter or a translator), leave Use Knowledge off. The agent will rely entirely on its instructions and any tools you attach.
Files you upload to an agent are used when someone chats with that agent. They are not searched in other members’ everyday chats, even when the agent is shared with the whole workspace. Each member’s everyday chat searches their own uploads and the company sources they can open.
28.7 Actions and tools
The Actions section is how the agent calls outside services or runs tools. Registered MCP tools and OpenAPI actions appear here as toggles alongside built-in capabilities such as image generation.

Things you can enable here:
- MCP tools. Tools exposed by MCP servers you have registered under Knowledge > MCP Actions and that you are permitted to access. Each registered server contributes one or more tools. A workspace-created agent keeps its explicit per-tool selection across chats, and the model decides whether and when to call an attached tool.
- OpenAPI actions. Endpoints from OpenAPI specs you have registered under Knowledge > OpenAPI Actions. Useful for hitting your internal REST APIs from inside a conversation.
- Image Generation. A per-agent toggle that lets the agent generate and manipulate images using AI-powered tools.
- File Reader. A per-agent toggle that lets the agent read the content of files uploaded to the chat or attached to the agent. It is on by default for new agents.
- Live App Search. Answers from apps that are searched live, such as Microsoft Teams, Outlook, Gmail, IMAP mail, and Sophea Meet, using the current member’s own connection when the question is asked. The row lists the apps available in your workspace and notes that each member uses their own connection. You can turn it on once you have connected one of these apps; until then, the row links to Connectors. Mail answers can search message sender, subject, body, and recent dates, while Sophea Meet can find recent meetings by name. Personal mail is never added to Knowledge Search; indexed meeting transcripts continue to use Knowledge Search.
For the full setup of MCP servers and OpenAPI actions (registration, auth modes, tool discovery, testing a spec), see Actions. This page only covers wiring an already-registered action onto an agent.
Attach only the tools the agent needs. Each enabled tool widens the agent’s surface area and adds to the latency budget of every reply. A focused agent with two tools usually beats a permissive agent with ten.
The default workspace assistant behaves differently: newly discovered MCP tools attach to it automatically, and each user can switch on an accessible MCP app in the composer’s Connectors panel (+ > Connectors, up to two at a time) to make its enabled actions available throughout the current chat. The model may use a relevant allowed action or answer without one. The selection remains active after completed, failed, and cancelled responses until the user turns it off or starts or switches chat context. This chat-scoped selection does not change the persistent tools attached to a workspace-created agent. Private, Team, and Workspace access on the MCP server still limits who can see and execute those tools.
28.8 Sharing and visibility
By default a workspace-created agent is private to its creator. Open the Share modal from the agent list or editor to change who can see and use it.
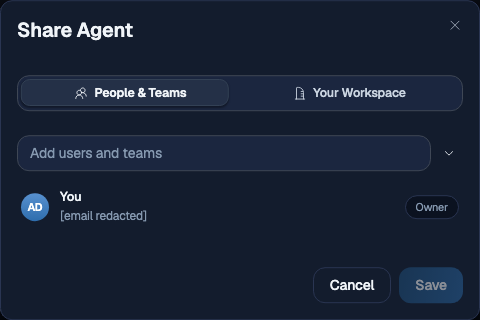
Type in Add members or teams to find workspace members by email or synchronized Portal Teams by name, or choose Everyone in workspace to make the agent available to the whole workspace. Each choice appears as a chip, and removing a chip removes that access. Nothing changes until you select Save. Copy link copies a link to the agent for people who already have access; the link does not grant access by itself.
The Discovery section controls how people find the agent. Workspace admins can turn on Feature this agent to show it at the top of the explore agents list and pin it to the sidebar for new users with access. Labels help people find the agent, because searching the agents list also matches label names. Pick an existing label or type a new one and press Enter.
Sharing a private agent with a Team follows the same Team-share notification contract as Projects, Connectors, and Document Sets: each active Team member who newly gains access receives one in-app notification and one email, and the row links to the agent gallery. The actor, the agent’s owner, workspace admins who already have access, and members who already had access are not recipients. Making an agent available to the whole workspace notifies nobody, because everyone already has access.
An agent’s own attached files follow the share: a Team member who gains access to the agent can also cite the files attached to it. Attached document sets and connectors do not follow the share, as the callout above says, so verify the agent and its knowledge scope separately as a real user.
After changing visibility, test both the agent picker and one knowledge question as a representative user. This confirms agent access and document access independently.
28.9 Publish an agent
“Publishing” in the workspace sense means making the agent available to users from the chat composer. There are two things to verify after you save:
The agent appears in the agent picker. Open a new chat and open the Agents menu in the composer. Your agent should be in the list, with the icon and description you set.
A real question works end to end. Pick the agent, ask one concrete question that exercises both its instructions and its attached knowledge, and read the answer carefully. Confirm:
- The tone matches your instructions.
- Citations point at the document set you attached, not at unrelated content.
- Any tools you enabled are called when the question demands them, and not called when it does not.
If something is off, go back to the editor. The most common fixes are tightening the instructions, narrowing the attached document set, or removing a tool the agent should not have had.
The same agent picker lists Sophea-published agents (when your Portal administrator has enabled them for your workspace) alongside your workspace-created agents. Users pick from the same control.
28.10 Chart and Presentation artifacts
When an enabled published agent creates a chart or presentation, Nous shows the result as an artifact card in the chat instead of placing the artifact JSON in the answer. Chart cards include a safe PNG preview and downloads for the JSON, SVG, and PNG files. Presentation cards include best-effort slide thumbnails and downloads for the PowerPoint and PDF files when those formats are available.
Artifact links are authenticated to the current workspace and remain available for 30 days. If a link has expired, ask Sophea to generate the chart or presentation again. SVG files are downloaded as attachments; they are not displayed as executable markup in the chat.
Chart and Presentation are published by default for workspaces that inherit the platform agent policy. The assistant automatically uses them for clear chart or deck creation requests in English or Greek, but neither is mandatory and neither appears as a selected composer step. Explicitly selected tools keep precedence. Chart plots the values the user gives, whether in a table, a list, or a sentence, and charts only the rows Sophea passes to it. Presentation can call Chart internally when complete rows are available. When a deck request explicitly asks for current research, Presentation can also call Web Search internally and only charts rows that are verified against cited source evidence. Presentation also generates pictures for up to four slides where a picture helps the story. If a picture cannot be generated in time, that slide keeps its decorative design and the rest of the deck is unaffected. They are always on in chat: the composer has no switch for either one, and they are not listed on the Agents page. A Portal administrator can still disable either agent globally or for a workspace.
An immediate follow-up such as “create a presentation about it” or “use that chart in a deck” reuses the exact Chart result from the preceding turn in the same conversation branch. Presentation preserves the source rows and chart visual rather than asking the model to reconstruct them. If the preceding chart is missing, ambiguous, expired, altered, or belongs to another workspace, Sophea asks the user to create or provide the chart again and does not generate a deck from unverified data. If secure storage cannot distinguish a missing chart from a temporary access problem, Sophea instead asks the user to try again.
28.11 Greek Legal and attached documents
When a user selects the Greek Legal agent, it reads the documents available in that chat: files attached to the current or earlier messages, and the files of the chat’s project or agent. Nothing else is shared with it, and a user only ever reaches files they can already open in that chat.
- Questions about what a document says (“What does the attached contract say about the notice period?”) are answered with the document’s own words: the passages that answer, quoted word for word with the answering words in bold and the clause or section named, under a note that this shows what the document says and is not a legal assessment. The same quotes appear under From your documents in the result card. These quotes are kept separate from legal sources and are never presented as legislation.
- Legal questions about a document (“Is clause 7 lawful?”, “Review this contract”) also need legal sources. If no suitable legal source supports a conclusion, the agent says so and still shows the relevant document quotes.
- Long documents are read in sections. When the agent did not read every section, or a file was too large or could not be read, the answer says which parts were reviewed, for example “Reviewed 12 of 87 sections of «Contract.pdf»; the rest was not read.” Ask about a specific clause or topic to get it read.
- Files that are still being processed, or could not be read, are named in the answer instead of the agent asking for them again.
28.12 Built-in Deep Research mode
Nous also has a separate built-in Deep Research mode. A workspace admin controls it through Settings > Chat Preferences, not through Portal’s published-agent selection. When enabled, it appears first in the composer’s Agents menu and runs alone. Choosing it asks for confirmation when other agents are selected, then deselects them and pauses the switches in the Connectors panel until Deep Research is turned off. It is not available in project chats.
Deep Research is a Nous chat mode controlled by Chat Preferences. It is independent of the published agents that your Portal administrator enables for the workspace.
A Deep Research run keeps going on the server when the user refreshes the page, navigates away, closes the tab, or loses the network. The same applies to an ordinary chat answer. Reopening the chat shows the answer as it is being written and follows it to the end, then shows the final result with its citations.
Only the Stop control cancels a run. A cancelled run stays cancelled and is still shown as cancelled after a refresh, so users can tell a deliberate stop apart from a connection that dropped.
Published Sophea agents are unaffected by this. They already run in the background after Nous accepts the handoff, and closing the tab never interrupted them.
For everything else (writing your own instructions, attaching your own document sets, wiring your own actions), stay in the workspace-created agent flow that the rest of this page describes.